Jump to: Postgres | MongoDB | MySQL | SQL Server | ConvexDocumentation Index
Fetch the complete documentation index at: https://powersync-convex.mintlify.app/llms.txt
Use this file to discover all available pages before exploring further.
Postgres
Version compatibility: PowerSync requires Postgres version 11 or greater.
- Ensure logical replication is enabled
- Create a PowerSync database user
- Create
powersynclogical replication publication
Supabase
Supabase
1. Ensure logical replication is enabled
No action required: Supabase has logical replication enabled by default.2. Create a PowerSync database user
SELECT privilege, and for the publication mentioned in the next step (as well as for any other publications that may exist).3. Create powersync publication
Also see our Supabase integration guide.
AWS RDS
AWS RDS
Prerequisites
The instance must be publicly accessible using an IPv4 address.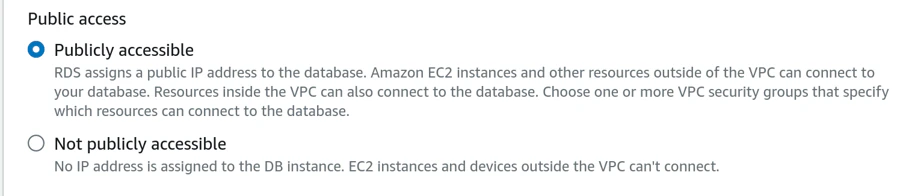
1. Ensure logical replication is enabled
Set therds.logical_replication parameter to 1 in the parameter group for the instance: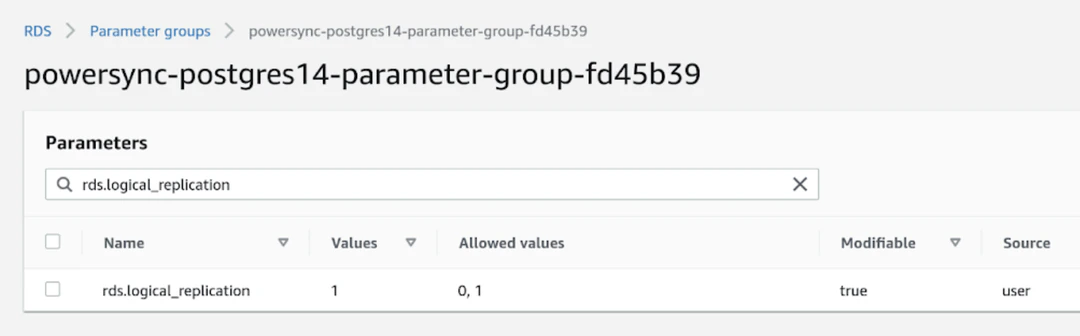
2. Create a PowerSync database user
Create a PowerSync user on Postgres:SELECT privilege, and for the publication (as well as for any other publications that may exist).3. Create powersync publication
Azure Postgres
Azure Postgres
PowerSync supports both Azure Database for PostgreSQL and Azure Database for PostgreSQL Flexible Server.To restrict read access to specific tables, explicitly list allowed tables for both the 3. Create
Prerequisites
The database must be accessible on the public internet. Once you have created your database, navigate to Settings → Networking and enable Public access.1. Ensure logical replication is enabled
Follow the steps as noted in this Microsoft article to allow logical replication.2. Create a PowerSync database user
SELECT privilege, and for the publication mentioned in the next step (as well as for any other publications that may exist).3. Create powersync publication
Google Cloud SQL
Google Cloud SQL
1. Ensure logical replication is enabled
In Google Cloud SQL Postgres, enabling the logical replication is done using flags: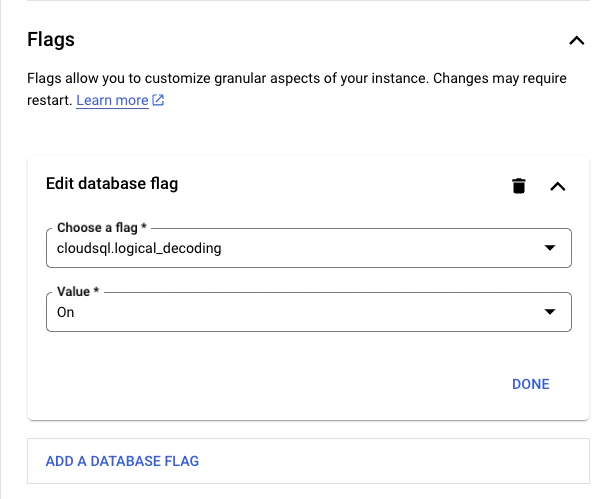
2. Create a PowerSync database user
SELECT privilege, and for the publication mentioned in the next step (as well as for any other publications that may exist).3. Create powersync publication
Neon
Neon
1. Ensure logical replication is enabled
To ensure logical replication is enabled:- Select your project in the Neon Console.
- On the Neon Dashboard, select Settings.
- Select Logical Replication.
- Click Enable to ensure logical replication is enabled.
2. Create a PowerSync database user
SELECT privilege, and for the publication mentioned in the next step (as well as for any other publications that may exist).3. Create powersync publication
Also see our Neon integration guide.
Fly Postgres
Fly Postgres
Fly Postgres is a Fly app with flyctl sugar on top to help you bootstrap and manage a database cluster for your apps.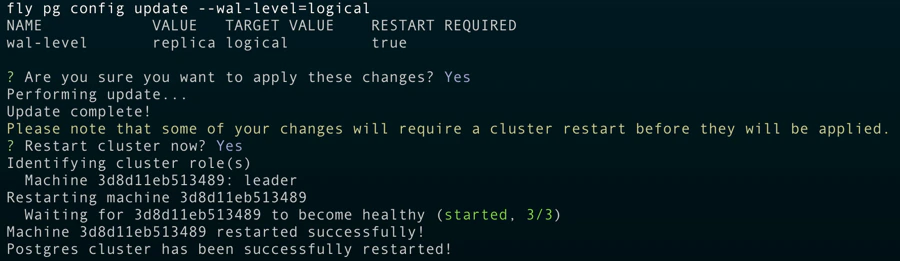
3. Create
1. Ensure logical replication is enabled
Once you’ve deployed your Fly Postgres cluster, you can use the following command to ensure logical replication is enabled:2. Create a PowerSync database user
SELECT privilege, and for the publication mentioned in the next step (as well as for any other publications that may exist).3. Create powersync publication
PlanetScale
PlanetScale
1. Ensure logical replication is enabled
No action required: PlanetScale has logical replication (wal_level = logical) enabled by default.2. Create a PowerSync database user
SELECT privilege, and for the publication mentioned in the next step (as well as for any other publications that may exist).3. Create powersync publication
Render Postgres
Render Postgres
Logical replication can be enabled for Render Postgres but you need to contact their support team. Here are some prerequisites before contacting them:
- The disk size must be at least 10 GB.
- You must be on a Professional workspace or higher.
- Database user for replication (you can use the default or create a new user yourself)
- Schema(s)
- Publication name (only if you want them to set
FOR ALL TABLES; otherwise, you’ll be able to create publications per table yourself later)
FOR ALL TABLES, you must let their support team know that you want the publication name to be powersync.Additional notes they’ll share with you:
We will reserve approximately 1/8 of your storage for wal_keep_size. This will not be available for your normal operations and will always be reserved no matter what.
We will also schedule maintenance for the database to pick up the changes. It will be initially scheduled for 14 days out with a deadline of 30 days out. Once the maintenance is added, you can reschedule to any time between immediately and the deadline. If you do nothing, it will run automatically at the initially scheduled time of 14 days out.
Xata
Xata
1. Ensure logical replication is enabled
2. Create a PowerSync database user
SELECT privilege, and for the publication mentioned in the next step (as well as for any other publications that may exist).3. Create powersync publication
Other / Self-hosted
Other / Self-hosted
Need help? Simply contact us on Discord and we’ll help you get set up.
3. Create
1. Ensure logical replication is enabled
PowerSync reads the Postgres WAL using logical replication in order to create buckets in accordance with your Sync Streams (or legacy Sync Rules).If you are managing Postgres yourself, setwal_level = logical in your config file:2. Create a PowerSync database user
SELECT privilege, and for the publication mentioned in the next step (as well as for any other publications that may exist).3. Create powersync publication
Unsupported Hosted Postgres Providers
Due to the logical replication requirement, not all Postgres hosting providers are supported. Notably, some “serverless Postgres” providers do not support logical replication, and are therefore not supported by PowerSync yet.See Also
MongoDB
Version compatibility: PowerSync requires MongoDB version 6.0 or greater.
Permissions Required: MongoDB Atlas
For MongoDB Atlas databases, the minimum permissions when using built-in roles are:changeStreamPreAndPostImages on replicated collections (i.e. the Post Images setting for the MongoDB connection on your PowerSync instance is set to Auto-Configure, which is the default for new PowerSync instances), additionally add the dbAdmin permission:
Privileges Required: Self-Hosted / Custom Roles
For self-hosted MongoDB, or for creating custom roles on MongoDB Atlas, PowerSync requires the following privileges/granted actions:listCollections: This privilege must be granted on the database being replicated.find: This privilege must be granted either at the database level or on specific collections.changeStream: This privilege must be granted at the database level (not on individual collections). In MongoDB Atlas, setcollection: ""or checkApply to any collectionin MongoDB Atlas if you want to apply this privilege on any collection.- If replicating from multiple databases, this must apply to the entire cluster. Specify
db: ""or checkApply to any databasein MongoDB Atlas.
- If replicating from multiple databases, this must apply to the entire cluster. Specify
- For the
_powersync_checkpointscollection add the following privileges:createCollection,dropCollection,find,changeStream,insert,update, andremove - To allow PowerSync to automatically enable
changeStreamPreAndPostImageson replicated collections (i.e. the Post Images setting for the MongoDB connection on your PowerSync instance is set to Auto-Configure, which is the default for new PowerSync instances), additionally add thecollModpermission on the database and all collections being replicated.
Post Images
To replicate data from MongoDB to PowerSync in a consistent manner, PowerSync uses Change Streams with post-images to get the complete document after each change. This requires thechangeStreamPreAndPostImages option to be enabled on replicated collections.
PowerSync supports three configuration options for post-images:
- Off: (
post_images: off): UsesfullDocument: 'updateLookup'for backwards compatibility. This was the default for older instances. However, this may lead to consistency issues, so we strongly recommend enabling post-images instead. - Auto-Configure: (
post_images: auto_configure) The default for new instances: Automatically enables thechangeStreamPreAndPostImagesoption on collections as needed. Requires the permissions/privileges mentioned above. If a collection is removed from Sync Streams (or legacy Sync Rules), you need to manually disablechangeStreamPreAndPostImageson that collection. - Read-only: (
post_images: read_only): UsesfullDocument: 'required'and requireschangeStreamPreAndPostImages: { enabled: true }to be set on every collection referenced in your Sync Streams/Sync Rules. Replication will error if this is not configured. This option is ideal when permissions are restricted.
read_only mode, run this command on each collection:
PowerSync Cloud:
Configure the Post Images setting in the database connection configuration in the PowerSync
Dashboard. Select your project and instance and go to Database Connections to
edit the connection settings.
Self-Hosted PowerSync:
Configure
post_images in the service.yaml file.MongoDB Atlas Private Endpoints Using AWS PrivateLink
If you need to use private endpoints with MongoDB Atlas, see Private Endpoints (AWS only).MySQL
MySQL support is currently in a Beta release.
Version compatibility: PowerSync requires MySQL version 5.7 or greater.
Binlog Configuration
To ensure that PowerSync can read the binary log, you need to configure your MySQL server to enable binary logging and configure it with the following server command options:server_id: Uniquely identifies the MySQL server instance in the replication topology. Default value is1.log_bin:ON. Enables binary logging. Default isONfor MySQL 8.0 and later, butOFFfor MySQL 5.7.enforce_gtid_consistency:ON. Enforces GTID consistency. Default isOFF.gtid_mode:ON. Enables GTID based logging. Default isOFF.binlog_format:ROW. Sets the binary log format to row-based replication. This is required for PowerSync to correctly replicate changes. Default isROW.binlog_row_image:FULL. Captures the complete row data for each change. This is required for PowerSync to correctly replicate changes. Default isFULL. TheMINIMAL/NOBLOBoptions will be supported in a future release.
Database User Configuration
PowerSync also requires a MySQL user withREPLICATION and SELECT privileges on the source databases. These can be added by running the following SQL commands:
Additional Configuration (Optional)
Binlog
The binlog can be configured to limit logging to specific databases. By default, events for tables in all the databases on the MySQL server will be logged.binlog-do-db: Only updates for tables in the specified database will be logged.binlog-ignore-db: No updates for tables in the specified database will be logged.
SQL Server
SQL Server support is currently in a Beta release.
Version compatibility: - PowerSync requires SQL Server 2019+ or Azure SQL Database. - SQL Server support was
introduced in version 1.18.1 of the PowerSync Service.
Supported Editions/Versions
| Database | Edition | Version | Min Service Tier |
|---|---|---|---|
| SQL Server 2019+ | Standard, Enterprise, Developer, Evaluation | 15.0+ | N/A |
| Azure SQL* | Database, Managed instance | N/A | Any service tier on vCore purchasing model. S3 tier and up on DTU purchasing model. See: Azure SQL Database compute requirements |
Limitations / Known Issues
- Spatial data types are returned as JSON objects as supplied by the Tedious
node-mssqlclient. See the notes here. - There is an inherent latency in replicating data from SQL Server to PowerSync. See Latency for more details.
Database Setup Requirements
1. Enable CDC on the Database
Change Data Capture (CDC) needs to be enabled on the database:2. Create the PowerSync Database User
Create a database user for PowerSync with the following permissions: Required permissions:- Read/Write permissions on the
_powersync_checkpointstable - Read permissions on the replicated tables
cdc_readerrole (grants access to CDC changetables and functions)SELECTpermission on the CDC schema (grants access to CDC metadata tables)VIEW DATABASE PERFORMANCE STATE(SQL Server and Azure SQL)VIEW SERVER PERFORMANCE STATE(SQL Server only)
For Azure SQL Database, the
VIEW SERVER PERFORMANCE STATE permission is not available and not required. Only VIEW DATABASE PERFORMANCE STATE is needed.3. Create the PowerSync Checkpoints Table
PowerSync requires a_powersync_checkpoints table to generate regular checkpoints. CDC must be enabled for this table:
powersync_user:
4. Enable CDC on Tables
CDC must be enabled for all tables that need to be replicated:@supports_net_changes can be set to 0.
CDC Management
Management and performance tuning of CDC is left to the developer and is primarily done by modifying the change capture jobs. See Change Data Capture Jobs (SQL Server) for more details. Capture Job settings of interest to PowerSync:- Polling Interval: The frequency at which the capture job reads changes from the transaction log. Default is every 5 seconds. Can be set to 0 so that there is zero downtime between scans, but this will impact database performance.
- Max Trans: The maximum number of transactions that are processed per scan. Default is 500.
- Max Scans: The maximum number of scans that are performed per capture job scan cycle. Default is 10.
- Retention: The retention period before data is expired from the CDC tables. Default is 3 days. If your PowerSync instance is offline for longer than this period, data will need to be fully re-synced. Specified in minutes.
| Parameter | Recommended Value |
|---|---|
maxtrans | 5000 |
maxscans | 10 |
pollinginterval | 1 second |
For Azure SQL Database, the CDC capture and cleanup jobs are managed automatically. Manual configuration is greatly
limited. See Azure CDC Customization
Limitations.
The main limitation is that the capture job polling interval cannot be modified and is fixed at 20 seconds. It is,
however, still possible to manually
trigger
the capture job on demand.
Latency
Due to the fundamental differences in how CDC works compared to logical replication (Postgres) or binlog reading (MySQL), there is an inherent latency in replicating data from SQL Server to PowerSync. The latency is determined by two factors:- Transaction Log Scan Interval: The frequency at which the CDC capture job scans the transaction log for changes. The default value of 5 seconds can be changed by modifying the capture job settings on SQL Server. The recommended value is 1 second, but this can also be set to 0 based on the database load. For Azure SQL Database, the default value is 20 seconds and cannot be changed. See Azure CDC Customization Limitations for more details.
-
Polling Interval: The frequency at which PowerSync polls the CDC change tables for changes. The default value is once every 1000ms. This can be changed by setting the
pollingIntervalMsparameter in the PowerSync configuration.
Memory Management
During each polling cycle, PowerSync will read a limited number of transactions from the CDC change tables. The default value of 10 transactions can be changed by setting thepollingBatchSize parameter in the PowerSync configuration.
Increasing this will increase throughput at the cost of increased memory usage. If the volume of transactions being replicated is high, and memory is available, it is recommended to increase this value.
Connection configuration parameters for the PowerSync SQL Server Adapter like
pollingIntervalMs and
pollingBatchSize can currently only be set when self-hosting PowerSync. See SQL
Server Additional
Configuration for more
details. We are planning to expose these settings for SQL Server source database connections in the PowerSync
Dashboard for PowerSync Cloud instances.Convex
Convex support is currently in an Open Alpha release. APIs, configuration, schema-change
handling, metrics, and replication behavior may change before this connector is considered stable.
document_deltas stream and filters rows according to your Sync Streams.
Convex does not support user-defined database schemas or namespaces in the same way as SQL databases. In Sync Streams, use the default convex schema when qualifying source tables.
Connection Requirements
PowerSync requires:- A Convex deployment URL.
- A Convex deploy key. In the Convex Dashboard, go to Settings → General and generate a deploy key for the deployment PowerSync should replicate.
- The
powersync_checkpointstable andcreateCheckpointmutation described below.
Checkpoint Table
PowerSync uses a small Convex table to generate write checkpoint markers. Convex table names cannot start with_, so the table is named powersync_checkpoints.
Add the table to your Convex schema:
convex/schema.ts
Checkpoint Mutation
Deploy a Convex mutation namedpowersync_checkpoints:createCheckpoint. PowerSync calls this mutation after recording a write checkpoint so the Convex delta stream advances even when the app is otherwise idle.
convex/powersync_checkpoints.ts
powersync_checkpoints from replicated source tables. The table exists only to advance the replication cursor for write checkpoint acknowledgements.
Client Writes
PowerSync does not write application data directly to Convex. Your app still needs an upload path that takes queued client-side writes and applies them through Convex mutations. In most Convex apps, you already define one or more mutation functions for each writable table. Your PowerSync backend connector can call those same mutations fromuploadData().
If you use Convex Auth tokens directly for PowerSync client authentication, configure PowerSync to accept the convex JWT audience. For self-hosted development this is configured in client_auth.audience; for PowerSync Cloud you can configure a custom audience in the instance settings. See Custom Authentication.
Schema Changes
Convex’s schema endpoint does not expose a monotonic schema version or checkpointable schema cursor. PowerSync uses the schema endpoint for table discovery and diagnostics, but it does not continuously diff Convex schema versions. When you add, remove, or change Convex fields or tables:- Update your Convex schema and deploy it.
- Update and redeploy your Sync Config.
Convex schema discovery can omit fields that have no stored values yet. If a field is defined in your Convex schema
but no document currently contains that field, it may not appear in PowerSync schema diagnostics until data exists for
it. When that happens, PowerSync falls back to runtime value inspection for later rows.
Sparse Fields and Int64 Values
ConvexInt64 values arrive in raw documents as base-10 strings. PowerSync can convert those strings to SQLite integers when Convex json_schemas reports the field as an Int64, but sparse fields can be missing from json_schemas until a document contains a value for them. Without schema metadata, an Int64 string is indistinguishable from a regular string.
To keep synced values consistent, cast Convex Int64 fields to TEXT in your Sync Streams. See the examples below.
Latency
PowerSync polls the Convexdocument_deltas endpoint for changes. This means there is an inherent latency between a write being committed in Convex and that change being replicated into PowerSync.
The polling interval defaults to once every 1000ms. When self-hosting PowerSync, you can configure this with the polling_interval_ms connection parameter:
service.yaml
Limitations
- Convex support is currently limited to the default Convex component.
- Convex
json_schemasdoes not expose a schema change token or revision cursor that can be checkpointed. - Convex
json_schemascan omit fields until stored data exists for those fields. This can affect type inference for optional or sparsely populated fields. - Convex
Int64andBytesvalues are ambiguous in raw JSON documents without schema metadata. CastInt64fields toTEXTin Sync Streams when you need stable client-side types. - PowerSync reports time-based replication lag for Convex, but not byte-based lag.
Sync Streams Examples
Use the defaultconvex schema when querying Convex tables.
The client creates a UUID in its local id column before the write is uploaded. Your Convex mutation should store that
value in a separate uuid field on the Convex document. PowerSync then syncs uuid AS id back to the client, so the
client keeps the same stable local ID while Convex keeps its own server-generated _id.
The example below uses one stream for a user’s lists and todos:
uuidas the synced client-sideidinstead of the Convex_id.list_uuidas the synced relationship column instead of the Convexlist_id.CAST(an_int64_column AS TEXT)to keep a ConvexInt64value stable on the client.substring(auth.user_id(), 1, 32)to extract the Convex user ID from a Convex Auth JWT subject. Convex Auth subjects include the 32-character user ID followed by|and the user session ID.